The Beauty of Table Looms
I’ve recently taught workshops at three of the regional weaving conferences this past summer, all of which were wonderful experiences with great students. A whole variety of looms show up at workshops in different makes, different sizes, and in a range from small table top looms to table looms on stands, to all types and sizes of floor looms.
Table looms are often a popular choice for workshops because their smaller size makes them easier to move around and they take up less space in one’s vehicle. Granted, they generally don’t have as much weaving space in front of the reed, don’t hold as tight of a tension as floor looms can, and are slower to weave on than looms with treadles. But there is much more to recommend them than just the relative ease of moving them around, and I often encourage my students to use table looms for my workshops if that is an option for them.
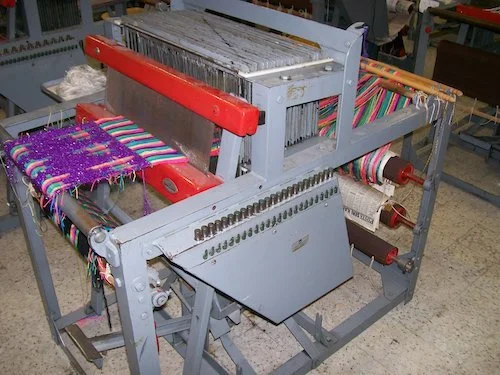
About fifteen years ago I went on a trip to Turkey with three other weavers. As part of our time there we visited the weaving department at Marmara University in Istanbul. To give you an idea of the importance that is placed on weaving in that culture there are 60 looms in the beginning weaving class. All of these looms were exactly the same, and while they were about the ugliest looms I have ever seen, I would have given my eyeteeth to have brought one home with me.
Looking something like a giant-sized Structo table loom on legs, these looms had 24 shafts controlled by individual push buttons on the side of the loom that had the shaft number emblazoned onto the top of them. Since the shaft buttons could be depressed one at a time and built up cumulatively, this enables the weaver to see the effect of each individual shaft as it is lifted. And then one step on a single foot pedal released any depressed shaft buttons all at once.
With 24 shafts there are 16,777,214 possible lift combinations (2 to the 24th power, minus 2 to eliminate the options of all shafts raised or all shafts lowered). Over 16 million possible lift combinations without changing a tie-up! And these were for the beginning weaving students - what an amazing way to learn and understand weaving!
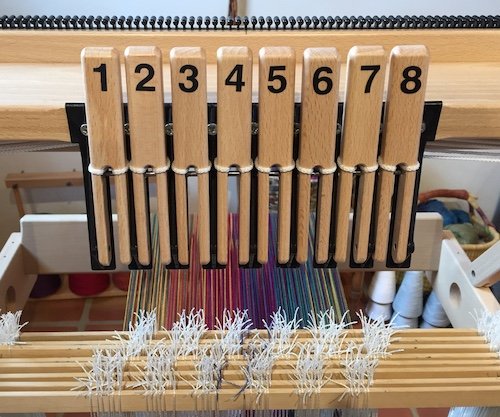
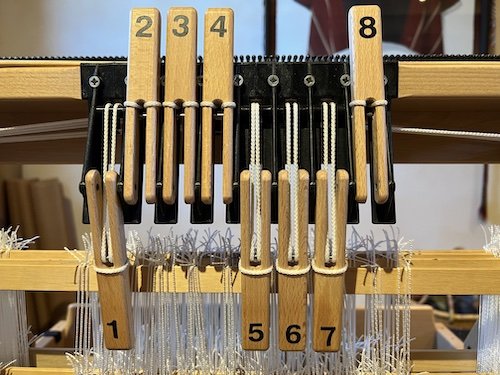
Even with my humble 8-shaft table loom there are 254 possible lift combinations, all right there at my fingertips. Since I don’t have those push buttons with the number branded into them I label my levers with the corresponding shaft number, and I label them on both sides of the lever so I can tell which number it is whether the lever is up or down.
In some of my doubleweave workshops we weave a 4-shaft sampler first, and then on the same warp weave a sampler in two blocks on 8-shafts. This is done by threading one block on shafts 1-4 and a second block on shafts 5-8.
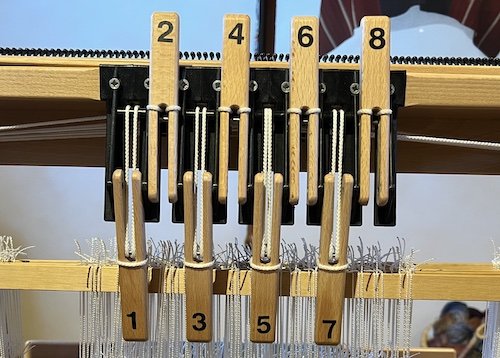
We can weave the 4-shaft sampler by ‘pretending’ that we are on a 4-shaft loom. This is done by lifting shaft 1 and 5 together, 2 and 6, 3 and 7, and 4 and 8 together, just as though you had treadles tied up to those pairs of shafts. To make this easier to do in practice I made little caps that can slide onto my levers with their new shaft numbers.
The two levers with the same number are always lifted in unison in this case, which makes both of your ‘4-shaft looms’ weave the same thing, and you are much less likely to make mistakes than if the levers had their original 1-8 numbering.
Besides having so many lift combinations right there at your fingertips it is also much easier to see visually what is going on in your weave structure by looking at your levers. For example, if my A block is threaded in a straight draw on shafts 1-4 and my B block is threaded in a straight draw on shafts 5-8, I could weave blocks of warp-face vs. weft-faced twill and see at a glance that I am weaving weft-faced twill in the A blocks and warp-faced twill in the blocks.
Likewise, in the case of block doubleweave, we lift one of four shafts to weave on the top layer and three of the four shafts to weave on the bottom layer. So I can do this on the same warp, and now I would be weaving on the top layer in the A blocks and on the bottom layer in the B blocks. And I can tell that right away just by looking at the levers.
I think this leads to a more intuitive understanding of what is happening in the weave structure than by stepping on treadles where it all just happens at once. I think it is an excellent way for weavers to learn new structures rather than by rotely following treadling sequences.
Another example of a structure where table looms are the ideal loom to weave on is decoratively stitching the two layers of doubleweave together. There are so many different designs that can be incorporated into the stitchers that you would quickly run out of enough treadles on a floor loom. But on a table loom you can make up designs visually on the fly just by looking at what happens when you lift a particular shaft or group of shafts to be your raised stitchers.
As you can see, I am a big fan of labelling levers, treadles, shuttles - whatever might be halpful in making the weaving process go quicker, easier, and with less likelihood of making errors. You might as well have more of your brain available for creativity rather than for trying to keep track of what is what. So I make visual labels for my floor loom treadles as well that create a visual system by treadle function, rather than by counting treadles 1-10, for example.
I wouldn’t think of using a table loom for weaving a large project, doing production weaving, or weaving something that needed to be done in time for a special event. But if I ever had to significantly downsize and contain my weaving space to a small room I would seriously consider keeping my table loom as my last loom. And I think I could keep myself very happily busy on it for the rest of my life.
I hope this might inspire you to look at whatever table loom you might have, or might think about getting, from a new perspective. And I hope that will inspire you to imagine all the possibilities that are right there at your fingertips just waiting to come to life.

